This is an old revision of the document!
Table of Contents
Customizing Patches and Modules
Basic Patch Menu
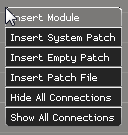
You already learned how to insert a module: right-click on the background of the patch window, and select 'Insert Module'. This menu is the patch menu:

Insert Modulelets you select a module, sorted in sections, to be insertedInsert System Patchlets you insert a system patch. System Patches are patches which are deemed important enough to be shipped with the software - they simply live in Distrib\Patches\System.Insert Empty Patchadds an empty patch, represented by a small grey rectangle. Doubble-click it to open it, or to 'fly' down into it.Insert Patch Fileopens a file explorer in order to navigate to another patchfile which can be inserted hereHide All Connectionshides all already patched 'wires'. This is useful for patches with many connections. Even with the connections hidden, hovering the mouse over a port temporarily shows its connection(s).Show All Connectionsmakes all connections visible again.
In order to save a patch, specifically select the patch window and select File/Save as from the top menubar - this makes sure this patch is saved in a separate file. If you don't do this, the patch is stored in the stage patch of this very project, but is no available for other projects.
Arranging Patches and Modules
Select
- In order to select one module/patch, simply click it - either at its background or its titlebar
- In order to select a group of modules/patches, draw a selection box around them (click in one corner, hold the mouse button, move diagonally for a reactangle, release mouse button)
- In order to move the entire viewport of the patch window hold the spacebar pressed and drag the contents with the mouse, or - with nothing selected - repeatedly hit the arrow keys (up/down/left/right)
Move
- in order to move one module/patch, click it, with the mouse button down move it to the target location, release it
- in order to move a group of modules/patches, draw a selection box around them, click one of the selected items, with the mouse button down move it to the target location, release it
Delete
Select one or more items you want to delete and hit the Delete key.
Copy
Ctrl-C and Ctrl-V do work here as well: select one or more items, press Ctrl and C to copy, then press Ctrl and V to paste the items - i the same or another patch window.
Undo/Redo
Ctrl+zundoes the last step, and can be repeated to go back several stepsCtrl+Shift+zredoes the last step, and can be repeated to go forward several steps
Rename
Double-click in the title, or behind it in the titlebar, in order to edit the title of a module or patch.
Resize
Grab and draw one of the edges of a module/patch in order to resize it.
Tweaking controls and ports
Controls and ports cannot be tweaked with simple mouseclicks as they are meant to register the click itself and act accordingly. Here are the keyboard/mouse combinations:
- to select one control or port, hold down
Ctrland click the item - to select some controls/ports, hold down
Ctrland draw a selection box - to delete one or more controls/ports, select them as decribed andpress
Delete - some operations on control/port level cannot be made undone. The way back in that case is: left-click the module and select 'Load Default Skin' - but this really resets the entire thing. Hence be careful when adjusting/deleting controls and ports. Another - more subtle - way is left-click and 'Show Port' resp. 'Show Parameter' - but you need to know the name of the item you have deleted.
- to change a label of a port or control, hold down
Ctrland double-click the label - my absolute favourite: in order to resize a control (e.g. buttons, faders, text areas, dropdown lists) hold down
Ctrl, place the mouse close to the bottom or right edge of the control (close means: a few pixels away from it), and press the left mouse button. If you hit the right spot the cursor will show arrows and you can drag the edge in order to resize the control.
